Here you will discover how to use the skills you’ve acquired in the educational game Fix EV3 Rover. Whether you are already a member of a FIRST® LEGO® League (FLL®) team, or you would like to become a member, this will help you find a team and understand the similarities and differences between Fix EV3 Rover instructions, and the blocks you’ll need to use when programming real LEGO MINDSTORMS® EV3 or SPIKE™ Prime robots in FLL competitions. You’ll also get an explanation of why the blocks used in Fix EV3 Rover are particularly useful in FLL competitions.
In the US the FLL competition season begins each fall and extends into the winter. Teams comprised of 2 to 10 children are coached by adults who are often teachers or parents of the participating kids who are 9 to 14 years old. See www.firstlegoleague.org for more information.
Starting 2019, LEGO began introducing a new Scratch-based programming language. Fix EV3 Rover allows users to play the game using either the older Symbols-based blocks, or the newer Scratch-based blocks.
The command blocks in Fix EV3 Rover are simplified versions of commands available in the LEGO programming languages, so it is useful to know how to apply what you learn in the game to programming actual robots. Below are some suggestions for making the transition to the programming language of your choice. The original EV3 Symbols-based block equivalents are listed first, then the EV3 Scratch-based block equivalents, followed by SPIKE Prime Scratch-based block equivalents. At the end of this page is a Q & A section.
EV3 SYMBOLS-BASED BLOCKS:
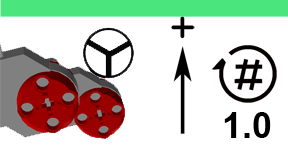 =
= 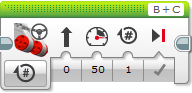 Use the “Move Steering” block from the green “Action” tab and configure the desired number of “Rotations” to move both the robot’s wheel motors
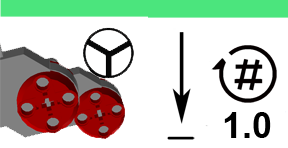 =
= 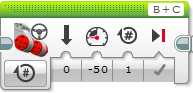 “Move Steering”, set “Power”
 ![]() to a negative number, and configure “Rotations”
to a negative number, and configure “Rotations”
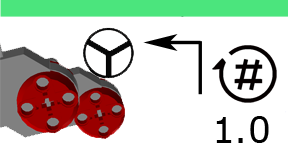 =
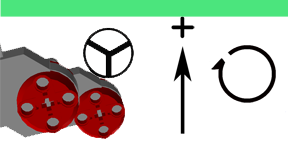
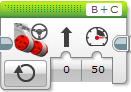
= 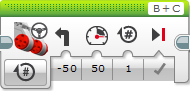 “Move Steering”, change “Steering” to “-50” so only the right wheel moves forward, then configure “Rotations”
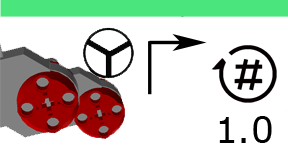 =
= 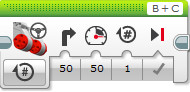 “Move Steering”, change “Steering” to “50” so only the left wheel moves forward, then configure “Rotations”
 =
=  “Move Steering” and set to “On”
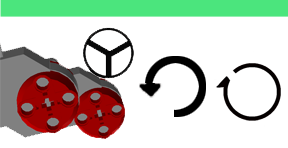 =
= 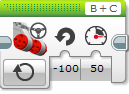 “Move Steering”, set to “On”, change steering to “-100” so wheels move in opposite directions to spin the robot left (available with the Fix EV3 Rover Pro upgrade)
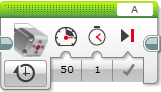
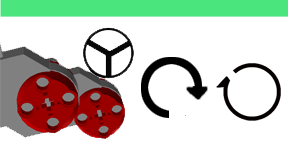 =
=  “Move Steering”, set to “On”, change steering to “100” so wheels move in opposite directions to spin the robot right (available with the Fix EV3 Rover Pro upgrade)
 =
=  Use the “Medium Motor” block from the green “Action” tab and set “On for Seconds” to rotate the robot arm’s motor
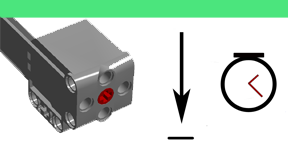 =
= 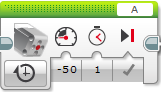 “Medium Motor”, set “On for Seconds”, and set “Power”
 ![]() to a negative number to rotate the robot arm’s motor in the reverse direction
to a negative number to rotate the robot arm’s motor in the reverse direction
 =
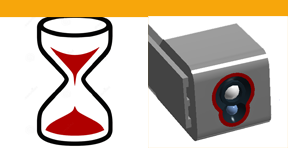
=  Use the “Wait” block from the orange “Flow Control” tab and set “Touch Sensor – Compare – State” to wait until the touch sensor touches something
 =
=  “Wait”, set “Color Sensor – Compare – Reflected Light Intensity”, and configure “Threshold Value” based on test readings of the color sensor, to wait for the color sensor to detect a darker color
 =
=  “Wait”, set “Brick Buttons – Compare – Brick Buttons” to pause the program, waiting for the center button (or screen) to be pressed before continuing (available with the Fix EV3 Rover Pro upgrade)
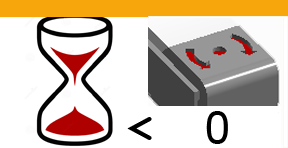 =
=  While the robot is spinning left, “Wait”, set “Gyro Sensor – Compare – Angle”, and configure “Threshold Value” to just before the desired angle to turn to (available with the Fix EV3 Rover Pro upgrade)
 =
=  While the robot is spinning right, “Wait”, set “Gyro Sensor – Compare – Angle”, and configure “Threshold Value” to just before the desired angle to turn to (available with the Fix EV3 Rover Pro upgrade)
EV3 SCRATCH-BASED BLOCKS:
 =
= ![]() Get the “move forward for 1 rotations” block from the “Movement” section and configure the desired number of “Rotations”
Get the “move forward for 1 rotations” block from the “Movement” section and configure the desired number of “Rotations”
 =
= ![]() Get the “move forward” block, change to “move backward” and configure the desired number of rotations
Get the “move forward” block, change to “move backward” and configure the desired number of rotations
 =
=  Get the “move straight for 1 rotations” block, change to “left: -50” so only the right wheel moves forward, then configure the desired number of rotations
 =
= ![]() Get the “move straight for 1 rotations” block, change to “right: 50” so only the left wheel moves forward, then configure the desired number of rotations
Get the “move straight for 1 rotations” block, change to “right: 50” so only the left wheel moves forward, then configure the desired number of rotations
 =
= ![]() Use the “start moving straight: 0” block
Use the “start moving straight: 0” block
 =
= ![]() Get the “start moving straight: 0” block, change to “left: -100” so wheels move in opposite directions to spin the robot left (available with the Fix EV3 Rover Pro upgrade)
Get the “start moving straight: 0” block, change to “left: -100” so wheels move in opposite directions to spin the robot left (available with the Fix EV3 Rover Pro upgrade)
 =
= ![]() Get the “start moving straight: 0” block, change to “right: 100” so wheels move in opposite directions to spin the robot right (available with the Fix EV3 Rover Pro upgrade)
Get the “start moving straight: 0” block, change to “right: 100” so wheels move in opposite directions to spin the robot right (available with the Fix EV3 Rover Pro upgrade)
 =
= ![]() Get the “A run clockwise for 1 rotations” block from the blue “Motors” section and change to “seconds” to rotate the robot arm’s motor
Get the “A run clockwise for 1 rotations” block from the blue “Motors” section and change to “seconds” to rotate the robot arm’s motor
 =
=  Get the “A run clockwise for 1 rotations” block, change to “counterclockwise” and “seconds” to rotate the robot arm’s motor in the reverse direction
 =
= ![]() Get the “1 wait until pressed” block from the turquoise “Sensors” section to wait until the touch sensor touches something
Get the “1 wait until pressed” block from the turquoise “Sensors” section to wait until the touch sensor touches something
 =
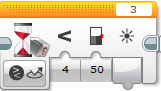
=  Get the “wait until” block from the butterscotch-colored “Control”” section, insert the “3 is reflected light intensity < 50%?” block from the turquoise “Sensors” section, and change the percentage based on test readings of the color sensor, to wait for the color sensor to detect a darker color
 =
= ![]() Get the “wait until center button is pressed” block to pause the program, waiting for the center button (or screen) to be pressed before continuing (available with the Fix EV3 Rover Pro upgrade)
Get the “wait until center button is pressed” block to pause the program, waiting for the center button (or screen) to be pressed before continuing (available with the Fix EV3 Rover Pro upgrade)
 =
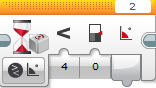
= ![]() While the robot is spinning left, get the “2 wait until angle is less than (<) 45”, and set the angle to be just before the desired angle (available with the Fix EV3 Rover Pro upgrade)
While the robot is spinning left, get the “2 wait until angle is less than (<) 45”, and set the angle to be just before the desired angle (available with the Fix EV3 Rover Pro upgrade)
 =
= ![]() While the robot is spinning right, get the “2 wait until angle is less than (<) 45”, change to “>”, and set the angle to be just before the desired angle (available with the Fix EV3 Rover Pro upgrade)
While the robot is spinning right, get the “2 wait until angle is less than (<) 45”, change to “>”, and set the angle to be just before the desired angle (available with the Fix EV3 Rover Pro upgrade)
SPIKE PRIME SCRATCH-BASED BLOCKS:
= ![]() Get the “move ^ for 10 cm” block from the “Movement” section, change “cm” to “rotations”, and configure the desired number of rotations
Get the “move ^ for 10 cm” block from the “Movement” section, change “cm” to “rotations”, and configure the desired number of rotations
= ![]() Get the “move ^ for 10 cm” block, change to “move v”, change “cm” to “rotations”, and configure the desired number of rotations
Get the “move ^ for 10 cm” block, change to “move v”, change “cm” to “rotations”, and configure the desired number of rotations
= Get the “move straight: 0 for 10 cm” block, change “cm” to “rotations”, change to “left: -50” so only the right wheel moves forward, then configure the desired number of rotations
= ![]() Get the “move straight: 0 for 10 cm” block, change “cm” to “rotations”, change to “right: 50” so only the left wheel moves forward, then configure the desired number of rotations
Get the “move straight: 0 for 10 cm” block, change “cm” to “rotations”, change to “right: 50” so only the left wheel moves forward, then configure the desired number of rotations
= ![]() Use the “start moving straight: 0” block
Use the “start moving straight: 0” block
= ![]() Get the “start moving straight: 0” block, change to “left: -100” so wheels move in opposite directions to spin the robot left (available with the Fix EV3 Rover Pro upgrade)
Get the “start moving straight: 0” block, change to “left: -100” so wheels move in opposite directions to spin the robot left (available with the Fix EV3 Rover Pro upgrade)
= ![]() Get the “start moving straight: 0” block, change to “right: 100” so wheels move in opposite directions to spin the robot right (available with the Fix EV3 Rover Pro upgrade)
Get the “start moving straight: 0” block, change to “right: 100” so wheels move in opposite directions to spin the robot right (available with the Fix EV3 Rover Pro upgrade)
=  Get the “A run -> for 1 rotations” block from the blue “Motors” section, change from “A” to the arm motor’s port (e.g. “C”), and change to “seconds” to rotate the robot arm’s motor
= ![]() Get the “A run -> for 1 rotations” block, change from “A” to the arm motor’s port (e.g. “C”), change to “<-” and “seconds” to rotate the robot arm’s motor in the reverse direction
Get the “A run -> for 1 rotations” block, change from “A” to the arm motor’s port (e.g. “C”), change to “<-” and “seconds” to rotate the robot arm’s motor in the reverse direction
= ![]() Get the “wait until _” block from the butterscotch-colored “Control”” section, insert the “A is pressed?” block from the turquoise “Sensors” section, and change from “A” to the touch sensor’s port (e.g. “F”) to wait until the touch sensor touches something
Get the “wait until _” block from the butterscotch-colored “Control”” section, insert the “A is pressed?” block from the turquoise “Sensors” section, and change from “A” to the touch sensor’s port (e.g. “F”) to wait until the touch sensor touches something
= ![]() Get the butterscotch “wait until _” block, insert the turquoise “A reflection < 50%?” block, change from “A” to the color sensor’s port (e.g. “E”), and change the percentage based on test readings of the color sensor, to wait for the color sensor to detect a darker color
Get the butterscotch “wait until _” block, insert the turquoise “A reflection < 50%?” block, change from “A” to the color sensor’s port (e.g. “E”), and change the percentage based on test readings of the color sensor, to wait for the color sensor to detect a darker color
= ![]() Get the butterscotch “wait until _” block, insert the turquoise “is left button pressed?” block, to pause the program, waiting for the left button (or screen) to be pressed before continuing (available with the Fix EV3 Rover Pro upgrade)
Get the butterscotch “wait until _” block, insert the turquoise “is left button pressed?” block, to pause the program, waiting for the left button (or screen) to be pressed before continuing (available with the Fix EV3 Rover Pro upgrade)
=  While the robot is spinning left, get the butterscotch “wait until _” block, insert the “_ < 100” block from the green “Operators” section, insert the turquoise “pitch angle” block, change “pitch” to “yaw”, and set the angle to be just before the desired angle (available with the Fix EV3 Rover Pro upgrade)
=  While the robot is spinning right, get the butterscotch “wait until _” block, insert the green “_ > 100” block, insert the turquoise “pitch angle” block, change “pitch” to “yaw”, and set the angle to be just before the desired angle (available with the Fix EV3 Rover Pro upgrade)
Q & A
Now for some questions and answers about the commands used in Fix EV3 Rover, and their relation to commands used when participating in FLL competitions:
Q: There are dozens of commands available in the LEGO robotics programming languages. What’s so special about these commands?
A: These commands were specifically chosen because they are among the most useful for controlling robots in FLL competitions. Once you have mastered these commands you are free to explore other commands in the LEGO robotics programming languages, but you may not need to use anything more than these.
Q: Why are only one-wheel turns available in the game, when there are perfectly good ways of turning using both wheels?
A: Experienced FLL competitors have discovered that moving just one wheel for turning the robot will result in more consistent, repeatable results than turns where both wheels are moving.
Q: What does the “Power” setting do in the Symbols-based blocks, and how does it affect a motor’s direction of rotation?
A: Fix EV3 Rover uses simplified command blocks that don’t use a “Power” setting. When using the EV3 programming language to create programs for real EV3 robots, you need to understand how “Power” works. Positive “Power” numbers, ![]() , rotate the motors forward, and negative “Power” numbers,
, rotate the motors forward, and negative “Power” numbers, ![]() , rotate the motors backward. The larger the positive number, the faster it will move forward; the smaller the negative number, the faster it will move backward.
, rotate the motors backward. The larger the positive number, the faster it will move forward; the smaller the negative number, the faster it will move backward.
Q: Why is “On/Move for Rotations” used for moving the robot? Why not use “seconds” or “degrees”?
A: Moving a motor “360 degrees” is identical to moving a motor “1.0 rotation”, so either would work. But to make the robot travel over a large distance, “rotations” results in more manageable numbers. There’s a temptation to use “seconds” when moving the robot’s wheels, but this is not recommended since the distance traveled will change if you later change the speed to make it move slower or faster. If you use “rotations”, changing the speed will not affect the distance the robot travels.
Q: EV3 Rover always moves or turns consistently, based on the number of motor rotations. Why don’t real LEGO robots behave more consistently for a given number of motor rotations?
A: There are many factors that can influence the reliability of real LEGO robots. One of the most common problems is caused by a tire slipping on the surface of the competition playing field. Slippage can be caused by: speed being too fast, robot parts rubbing against a wheel, weight distributed unevenly between the driving wheels, not enough weight directly over the driving wheels, rubber tires used on non-driving wheels, attachments or wires rubbing against the playing field under the robot, accumulation of dust on the playing field or tires.
Q: Why is the robot’s starting position always against the left edge of the screen, near the bottom?
A: The starting “base” for many competitions is in one of the corners of the playing field. If the robot has a flat surface at its rear that can be used to back it up against the playing field wall to quickly aim it before starting, it will behave more reliably. Aiming the robot without a physical guide can be slower and less accurate when competing.
Q: Why is “On for Seconds” used for raising and lowering the robot arm, instead of “On for Rotations” or “On for Degrees”?
A: If you use “On for Rotations” or “On for Degrees” to move the arm, and the arm runs into an obstacle before the required degrees or rotations have completed, the program will stall and the robot will freeze while the program tries to complete the instruction. If you use “On for Seconds” to move the arm, the program will continue after the designated time, even if the arm runs into an obstacle.
Q: How do I know what “Threshold Value” to put in a “Wait – Color Sensor” block to detect when the robot encounters a black line?
A: Before using the Color Sensor to “Compare Reflected Light Intensity”, the color sensor must be calibrated in the environment where it will be used. To calibrate the color sensor: a) turn on the EV3 and press the right button to the third tab on the screen, b) Press the center button to select “Port View”, c) move right to Port 3 “COL- REFLECT” (where the color sensor is likely to be connected), d) place the EV3’s color sensor over a light colored area and note the number that appears on the screen, e) place the EV3’s color sensor over the nearby black line that you want to detect and note the number that appears on the screen, f) average these two numbers, and use this average as the “Threshold Value” in the program.
Q: Why can’t you end a program with “Move Steering – On” to make the robot keep going forward indefinitely?
A: When a program runs this command, it starts the motors turning and then quickly moves on to the next instruction to see what to do next. If there is no next instruction, the program ends and all motors are immediately stopped.
Q: Why doesn’t EV3 Rover make use of a gyro sensor, or an ultrasonic or infrared sensor?
A: The infrared or ultrasonic sensors can detect the distance between it and another object, but they are not very reliable or accurate. Counting wheel rotations or using a touch sensor is usually more accurate. The gyro sensor is available in the Pro upgrade of Fix EV3 Rover.
Q: Why can you only add or delete blocks at the very end of the program in Fix EV3 Rover?
A: Beginning programmers often try to write an entire program before testing any of it, only to find an error buried somewhere in the middle of the program when they finally run it. This makes it difficult to isolate the location of the problem. It is much better to write a few instructions and test that they work as expected before adding to the program. Being able to only add or delete blocks from the end of the program encourages this practice. If you upgrade to Fix EV3 Rover Pro, you will be able to add, delete, and rearrange blocks in the middle of the program for levels 7 and above.
Q: When will more levels and features be added to the game?
A: An in-app upgrade to Fix EV3 Rover Pro is available for a nominal fee. If you have mastered the first 12 levels of the free version, you can try your hand at the challenges offered in the Pro upgrade. Let me know here if you have suggestions for future enhancements.
LEGO®, MINDSTORMS®, SPIKE™, and LEGO® logos are trademarks of The LEGO® Group, which does not sponsor, authorize or endorse this product. FIRST®, and all of its trademarks, FIRST®, FIRST® LEGO® League, and FLL® are trademarks of FIRST®, which does not sponsor, authorize or endorse this product.